Units
Units page access
Users with Administrator or Guard role can see all configured units belonging to all configured parks and they are allowed to set units in service state, add new units and edit existing ones.
Users with Plant owner or Plant user role can see all configured units belonging to the parks that these users have access to and they are allowed to set unit(s) in service state.
Users with Observer role have read-only permission.
Units tab for selected plant gives a clear overview of all units that belong to this park.
On this screen user can (if has a proper permission):
- check current unit statuses,
- set units in service state,
- create and add new units,
- edit the existing units.
Units - main screen
Each unit is presented as a tile with following information:
- Unit's name, fuel type, min/max effect
- Type of unit marked by one of the following icons:
- for production units
- for consumptions units
- for combined (production + consumption) unit
- no arrow - for neutral units
-
Unit's state: Active or Inactive
-
Out of service occurs if unit has been set out of service state - see section Set unit(s) in service state. Pressing opens a popup where user can extend service state until indicated date and time. Additionally if during service period there is a change to summer / winter time, the start and end date will be marked respectively:
- for date that is in summer time (DST)
- for date that is in winter time (not DST)
Hovering on the icons will bring a tooltip with above information.
-
appears if unit does not have configured / active both requested ramps (Startup and Shutdown) - see section Ramps.
-
Trash bin occurs if unit can be deleted - see section Delete unit
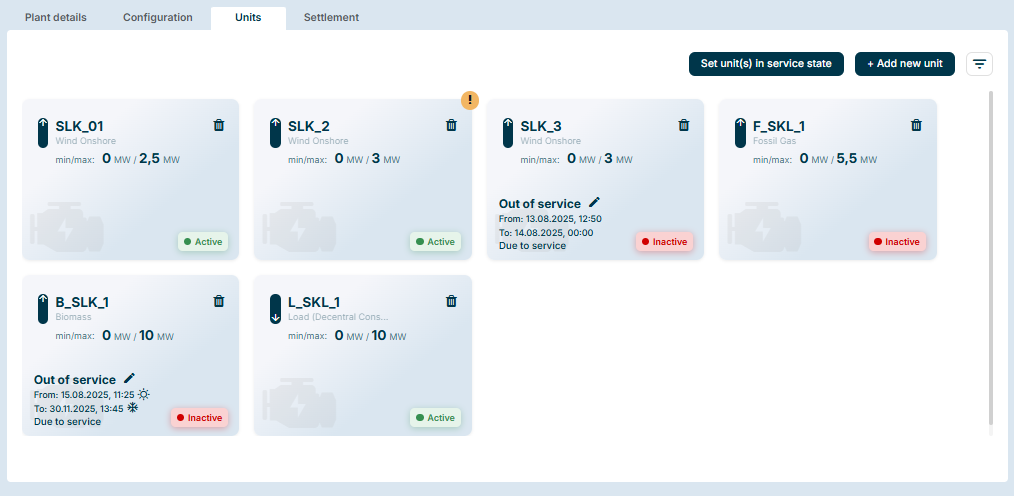
Additionally at the top of Units screen following options are available:
- Set unit(s) in service state allows to set selected unit(s) in/out service state - see section Set unit(s) in service state
- + Create unit allows to create and configure a new unit for the selected park (this button is available only for Administrators and Guards) - see section Create unit
-
Filter pressing filter icon opens ribbon with all available options:
- Filter by keyword allows to find unit(s) by typing its name
- State filters units by their current state (Active/Inactive) selected from the drill down list
- Fuel type filters units by the type of fuel (Resource Object, Load (Decentral Consumption), Biomass, Fossil Gas, Fossil Hard Coal, Fossil Oil, Hydro Run-of-driver and pondage, Marine, Other renewable, Solar, Waste, Wind Offshore, Wind Onshore, Other) selected from the drill down list
- Type filters units by ist type (Production, Consumption, Combined, Neutral) selected from the drill down list
All selected filter options appear as bubbles at the top of the screen and user can deactivate them easily just by pressing button next to unwanted filter.
Note
By default the units are not filtered so all units from selected plant are displayed.

Create unit
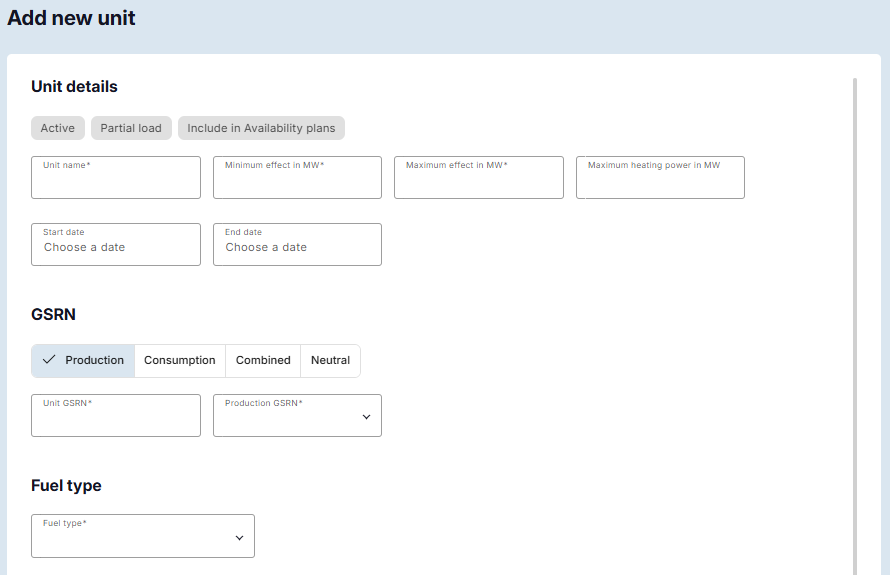
Pressing + Create unit button from Unit tab opens a window with data to be filled to create a new unit under the selected plant. The fields marked with asterisk * are mandatory as the minimum information that must be provided to create a unit:
- Unit details
- Active - marking this bar makes the unit active and visible immediately once it is created. User can activate and deactivate the unit whenever it is needed.
- Partial load - marking this bar makes bids with partial effect, otherwise only the Maximum effect will be allowed.
- Include in Availability plans - marking this bar includes the unit automatically in availability plans.
- External BSP Controlled - indicates that the unit is controlled by an external Balancing Service Provider (BSP).
- Unit name* - name of the unit that will be presented on all other screens.
- Minimum effect in MW / Maximum effect in MW / Maximum heating in MW
- Start date - allows to set a date from which the unit will be active.
- End date - allows to set a date after which the unit will be no longer active. It means that this unit will still exist in the plant however it will be inactive and ignored for all calculation.
- GSRN
- Production / Consumption / Combined / Neutral * - allows to assign unit to one of the unit's type by marking the proper field.
- Unit GSRN* - Unit Global Service Relation Number, it is unique 18 digit number which is used to identify the unit's meter.
- Production and/or Consumption GSRN* - depending on selected type of unit it is needed to provide:
- Production GSRN - for production unit,
- Consumption GSRN - for consumption unit,
- Production and Consumption GSRNs - for combined unit,
- no GSRN required - for neutral (non-production and non-consumption unit).
-
Fuel type - unit's fuel type selected from the drill down list (Biomass Fossil Gas, Fossil Hard Coal, Fossil Oil, Hydro Pondage, Hydro Run-Of-River, Load (Decentral Consumption), Marine, Other, Other Renewable, Resource Object, Solar, Waste, Wind Offshore, Wind Onshore).
Note
It is possible to select only one fuel type for a given unit and it is not possible to change it once the unit has been already created.
For some fuel types additional details can be provided but they are not mandatory to be able to create unit - see more details Additional options for specific fuel types
-
Location
- Latitude - latitude of the unit's location,
- Longitude - longitude of the unit's location,
- Identifier - unit's unique identifier.
Note
Latitude and Longitude are not information mandatory to be provided however they are needed for collecting weather data.
-
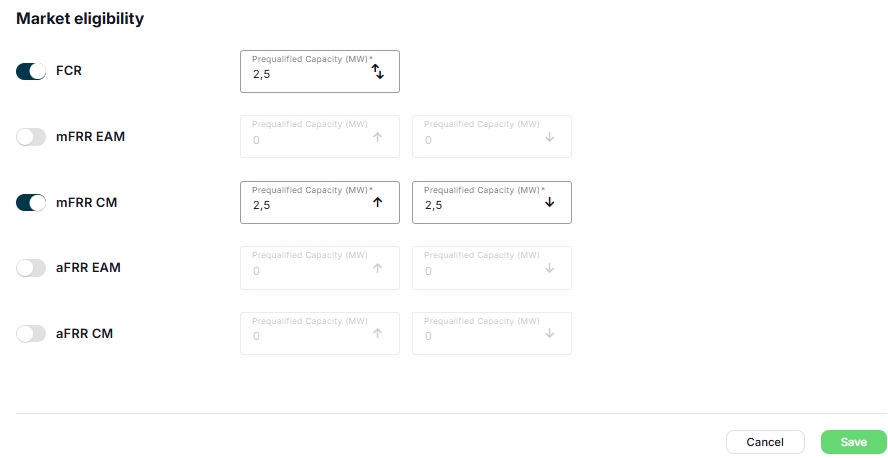
Market eligibility - defines which balancing market products the unit is eligible to participate in. Enable the required products using the toggle switch and specify the corresponding Prequalified (Capacity 9MW) up and down.
Note
FCR is a symmetric balancing product, meaning the same Prequalified Capacity is used for both upward and downward regulation.
mFRR and aFRR are asymmetric products, so separate Prequalified Capacity values must be specified for upward and downward regulation
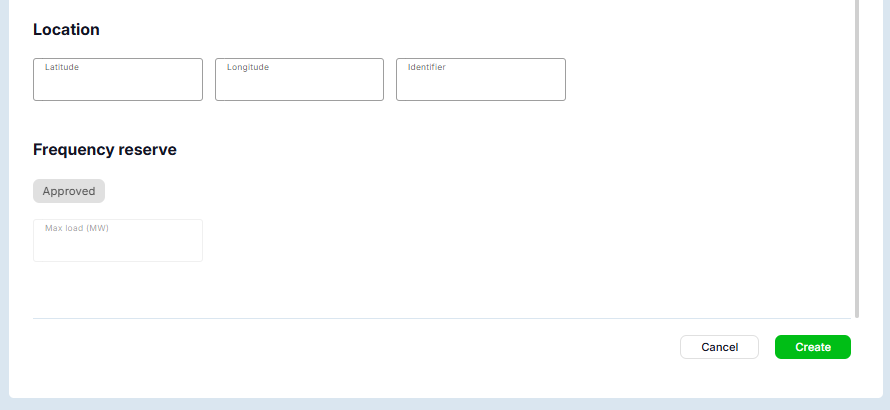
When all mandatory fields are filled, the plant can be saved by pressing Create button or entered data can be removed by pressing Cancel button.
Additional options for specific fuel types
When creating a unit, additional information may be required depending on the selected fuel type:
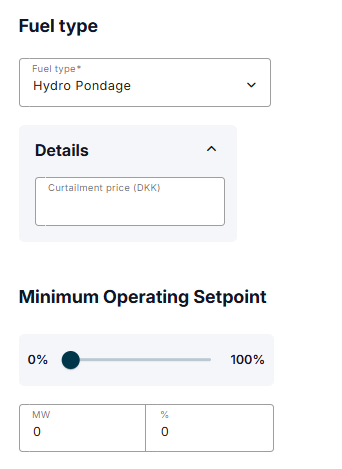
Hydro Pondage, Hydro Run-Of-River, Marine
- Curtailment Price (available for Hydro Pondage and Hydro Run-Of-River) - enter the curtailment price.
-
Minimum Operating Setpoint (available for Hydro Pondage, Hydro Run-Of-River and Marine) - specify the minimum operating setpoint using the slider or by entering a value in either MW or %. The values are synchronized automatically, so updating the slider, the MW value, or the percentage updates the other fields accordingly.
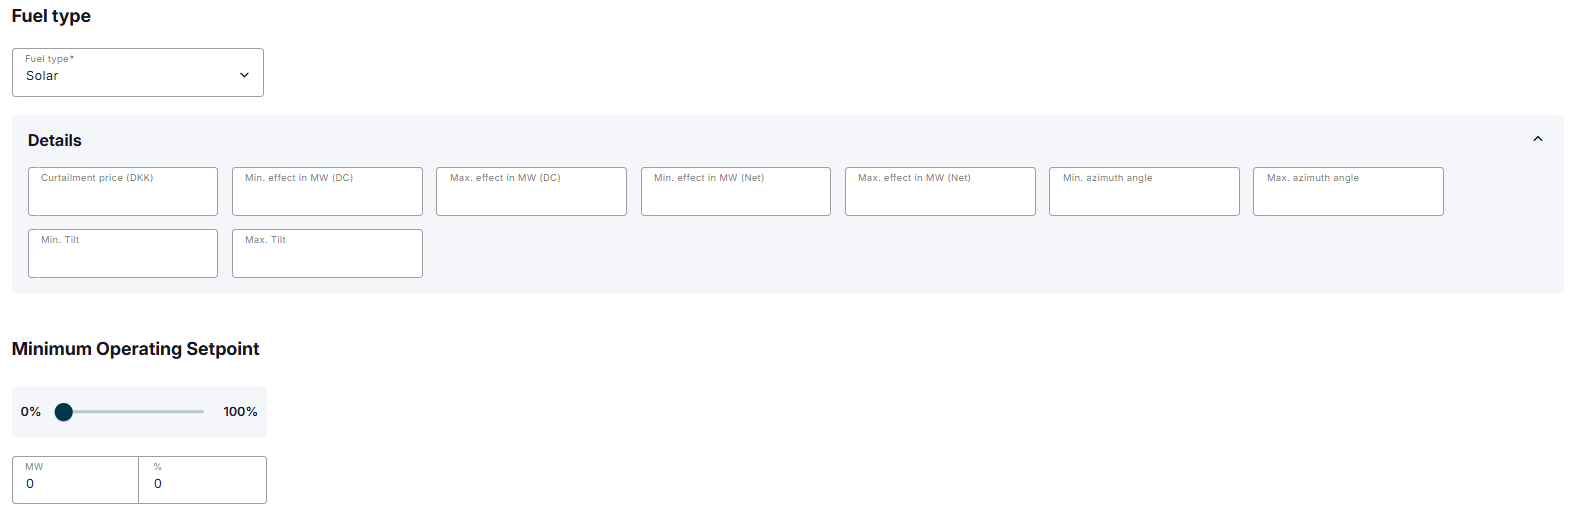
Solar
- Curtailment price - enter the curtailment price.
- Min. / Max. effect in MW (DC) - specify the minimum and maximum DC power output in MW.
- Min. / Max. effect in MW (Net) - specify the minimum and maximum net power output in MW.
- Min. / Max. azimuth angle - specify the minimum and maximum azimuth angle of the solar panels.
- Min. / Max Tilt - specify the minimum and maximum tilt angle of the solar panels.
-
Minimum Operating Setpoint - specify the minimum operating setpoint using the slider or by entering a value in either MW or %. The values are synchronized automatically, so updating the slider, the MW value, or the percentage updates the other fields accordingly.
Wind Offshore and Wind Onshore
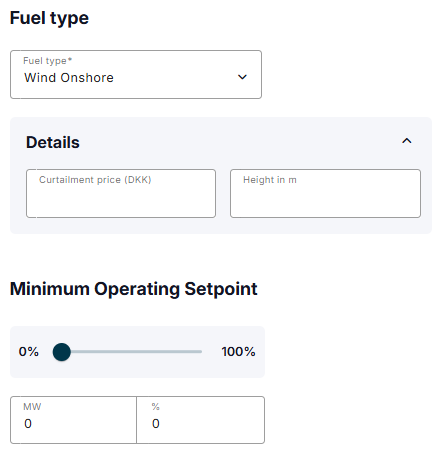
- Curtailment price - enter the curtailment price.
- Height in m - enter the turbine height in meters.
-
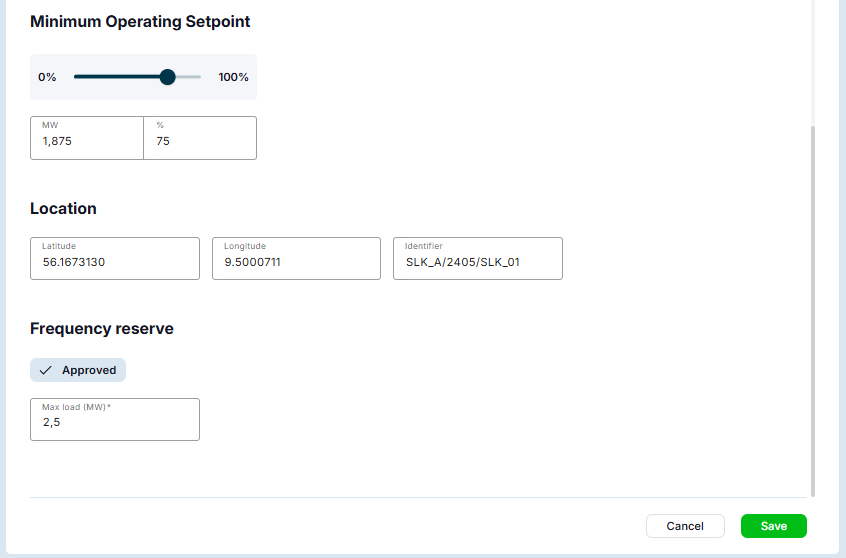
Minimum Operating Setpoint - specify the minimum operating setpoint using the slider or by entering a value in either MW or %. The values are synchronized automatically, so updating the slider, the MW value, or the percentage updates the other fields accordingly.
Delete unit
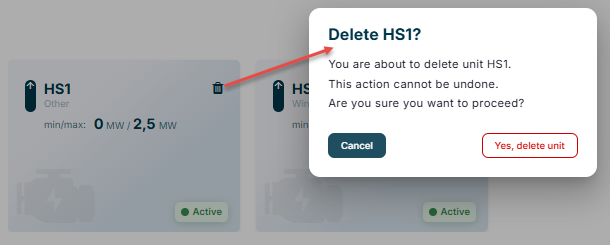
To delete a unit press icon on the unit's tile and confirm deletion:
Note
If trash bin icon does no appear on the unit's tile that should be deleted, it is necessary to check if there is any important data associated. If so, they must be deleted first.
Set unit(s) in service state
Pressing Set unit(s) in service state button allows to set selected unit in/out service state by selecting the proper checkbox:
-
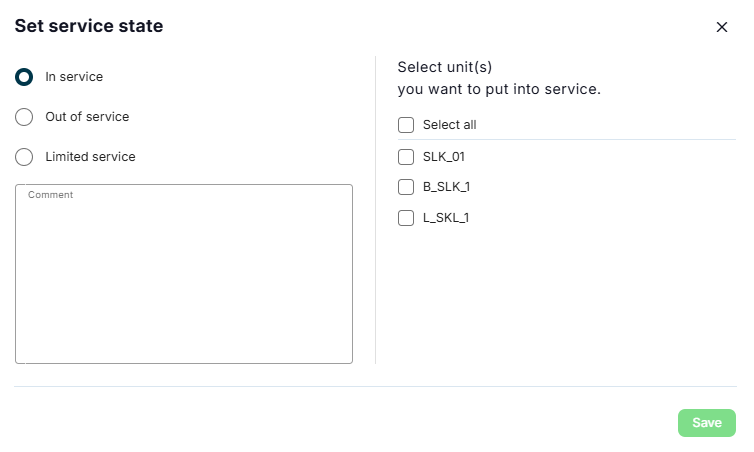
In service - just select unit(s) that should be set into service, enter a comment if needed and press Save button:
-
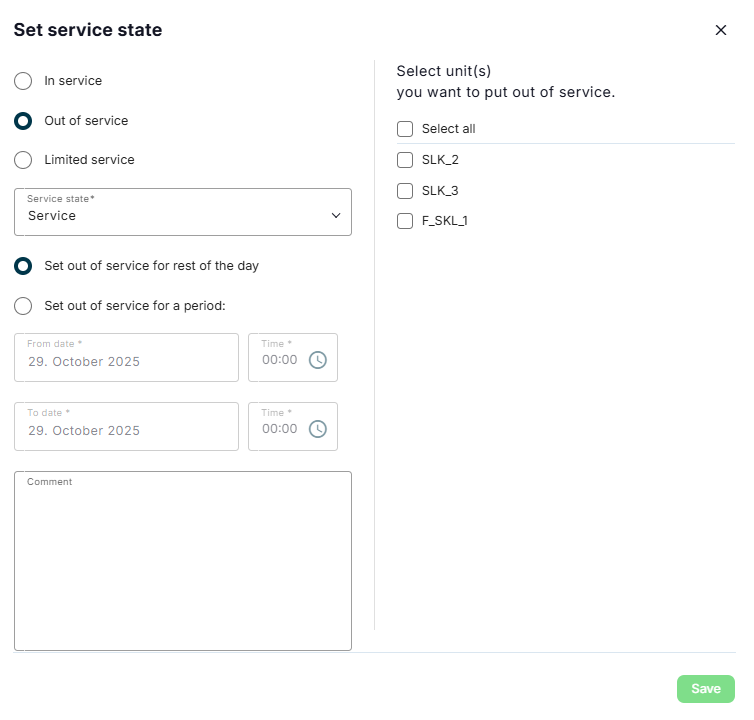
Out of service - pass following steps:
- select unit(s) that should be set out of service on the right side of popup
- select service state from the drill down list (Servicing, Damage or Other)
- select time when chosen unit(s) should be out of service state:
- for rest of the day - till the end of the current day
- for a period - then enter start and end date and time
- Type a comment if needed
- Press Save button
-
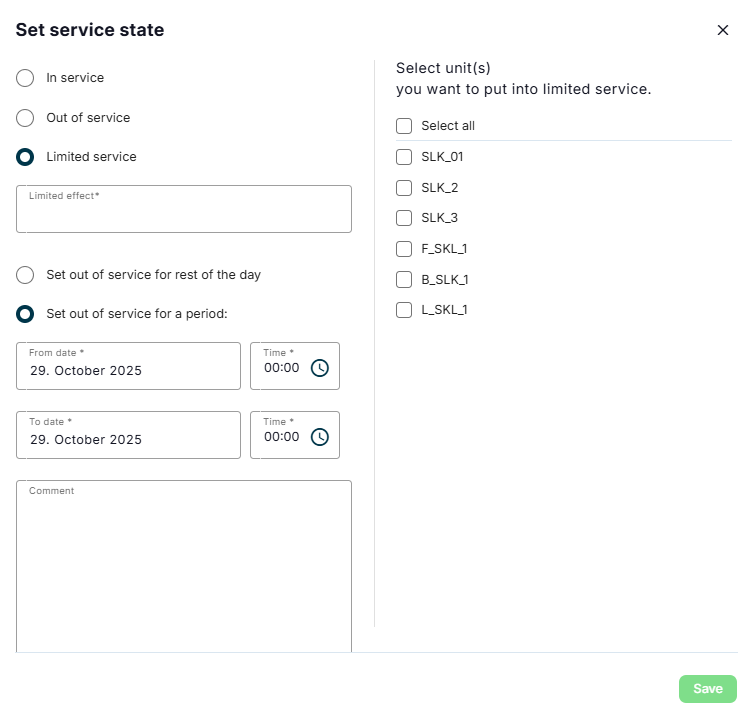
Limited service - pass following steps:
- select unit(s) that should be put into limited service on the right side of popup
- enter the limited effect value
- select time when chosen unit(s) should be in limited service state:
- for rest of the day - till the end of the current day
- for a period - then enter start and end date and time
- Type a comment if needed
- Press Save button
Unit setting
Clicking on a unit's tile from Unit tab opens a screen with all details, settings and configuration possibilities for the selected unit.
The screen consists of 5 tabs: Unit details, Configuration, Ramps, Bid automation and Service history which are described in detail in the appropriate tab below.
Unit details
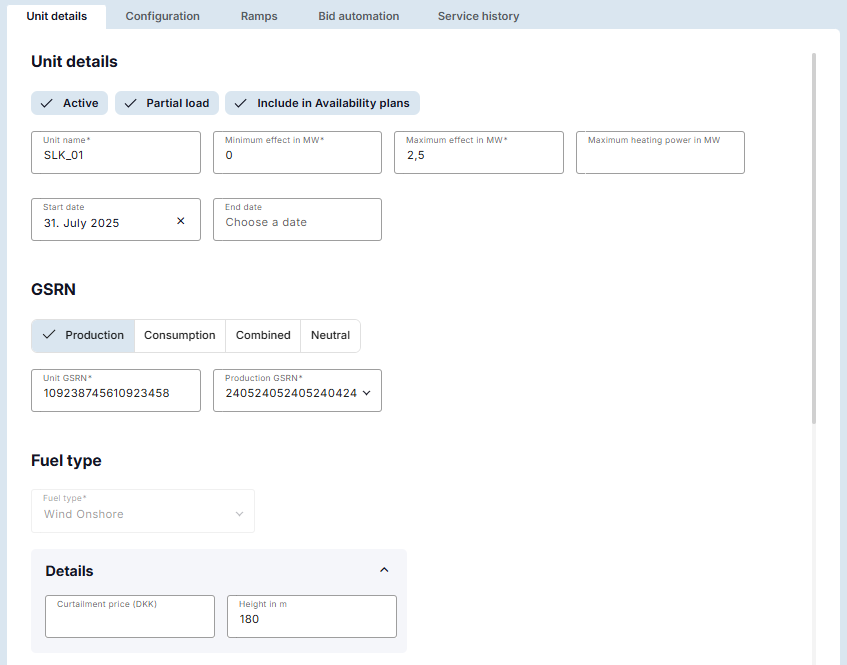
Unit details tab presents all data filled when unit was created - see section Create unit. All the unit data is editable, except Fuel type. Additionally here it is possible:
- Activate / deactivate the unit by marking / unmarking Active button.
- Activate / deactivate the partial load by marking / unmarking Partial load button.
- Include / exclude in Availability plans by marking / unmarking Include in Availability plans button.
-
Include / exclude in External BSP Controlled by marking / unmarking External BSP Controlled button.
Note
Include in Availability plan is available only for Denmark! It allows to include automatically the given unit in the generated file for Send availability plans option - see section Bids and Activities - main view.
-
Send signals / not send signals by marking / unmarking Send signals button.
Note
Send signals is available only for Finland! It allows to check availability and activation of the units participating in the energy market each minute - see section Signals.
-
Update unit name, minimum and maximum effect, maximum heating power and Start and End dates.
- Change unit type selecting the proper button: Production, Consumption, Combined or Neutral and update GSRNs numbers.
- Update details (the content depends on unit's type)
- Update Details and/or Minimum Operating Setpoint (if available for the given fuel type of unit - see more Additional options for specific fuel types).
- Update unit's location and its identifier.
- Edit Market eligibility - enable / disable the required products using the toggle switch and/or specify/edit the corresponding prequalified capacity.
Skip to the next Configuration tab.
Configuration
Similar to Plants it is necessary to connect each unit to relevant monitoring system(s) that will import data for Production and Consumption - see also section Plants / Configuration tab.
Configuration setup
Unit's configuration is done from the unit level on Configuration tab and requires to pass 3 following steps:
-
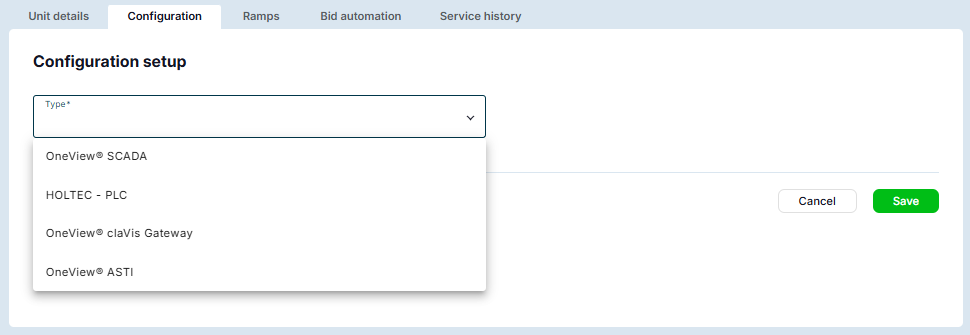
Select the relevant system from the drill down list (see also the detailed description of available integration systems Integration overview and Choosing the Right Integration):
-
Fill the required data depending on the previously selected system and push Save button:
-
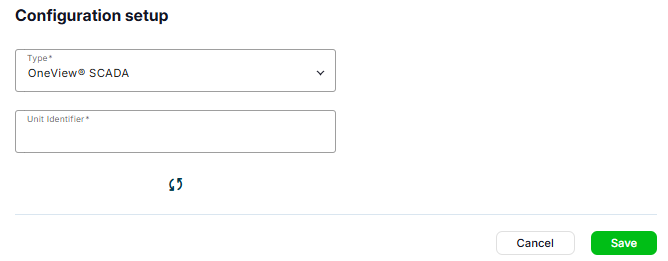
Unit Identifier for OneView SCADA
-
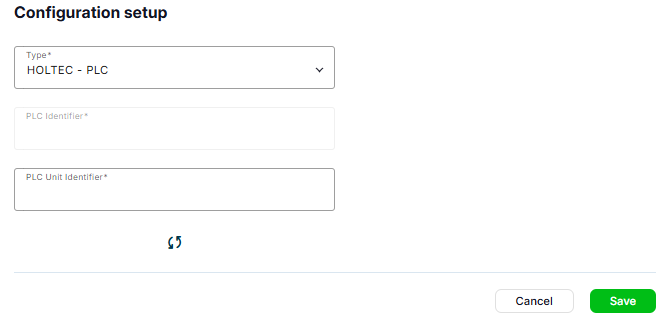
PLC Unit Identifier for HOLTEC - PLC
-
claVis Unit Identifier for OneView claVis Gateway
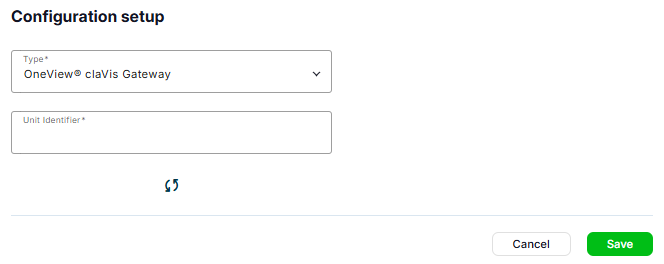
-
ASTI Unit Identifier for OneView
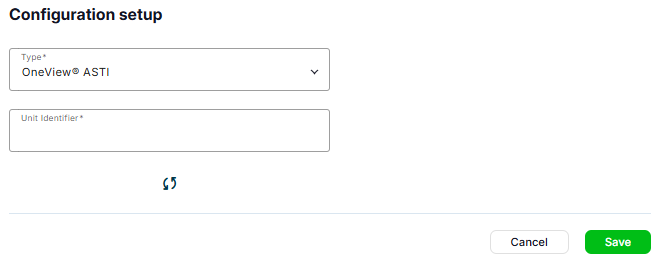
Important
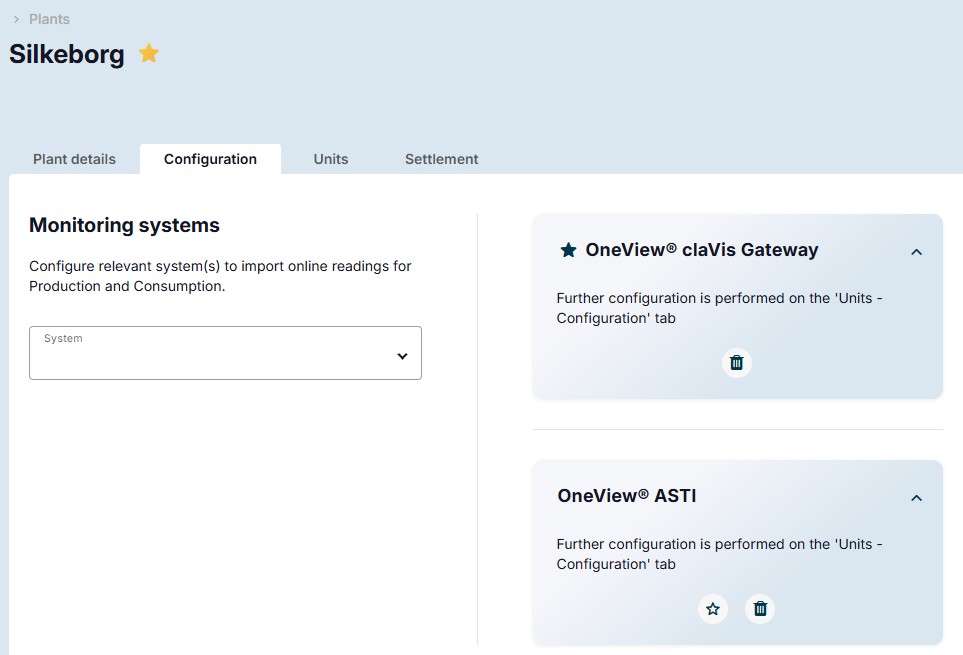
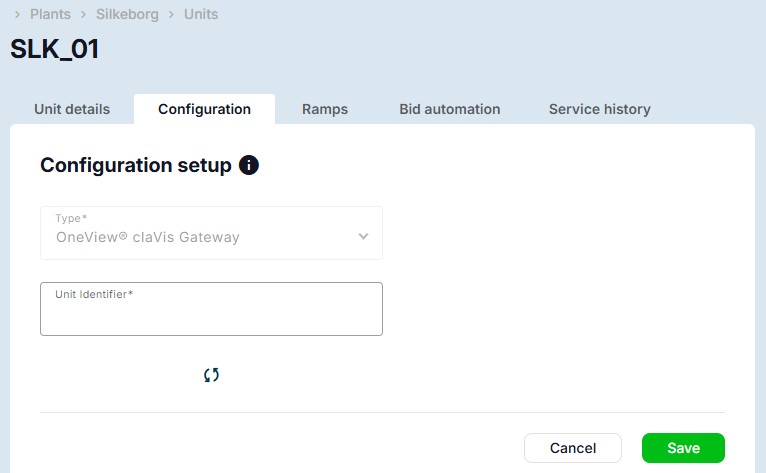
If for the plant, that configured unit belongs to, there is already selected OneView claVis Gateway or OneView ASTI as monitoring system then user, entering Configuration tab on unit level, will see the selected system from the plant level.
If both monitoring system are selected: OneView claVis Gateway and OneView ASTI, the Primary one will be used for unit configuration. On unit level it is required to provide Unit identifier.
In both cases it is not possible to change system from unit level (the monitoring system type is disabled and grayed out) - this must done on plant level - see section Plants / Configuration tab.
-
-
Press icon to test the connection. If the connection is established correctly, icon will change to and hovering it brings a tooltip with more detailed information:
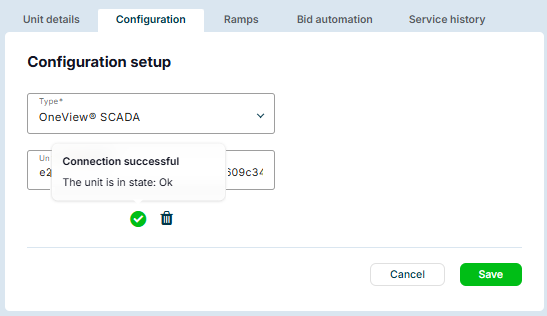
If connection is not established correctly, user is informed about it and asked to verify the connection by alert message:

It is also possible to delete already configured system pressing icon.
Note
-
Configuration tab is available only for Producing, Consuming and Combined units, so it is unavailable and grayed out for units with Neutral type.
-
It is possible to configure only 1 monitoring system for one unit.
Skip to the next Ramps tab.
Back to the previous Unit details tab.
Ramps
For each unit it is required to define 2 ramps that define time and interval steps when:
- unit is to be turned on and to increase power from 0 to nominal value - called Startup ramp
- unit is to be turned off and to decrease power from nominal value to 0 - called Shutdown ramp
The yellow bubble appears on Ramps tab informing how many ramps are still missed to be configured or activate. To start, press + Create ramp button - see section Create ramp:
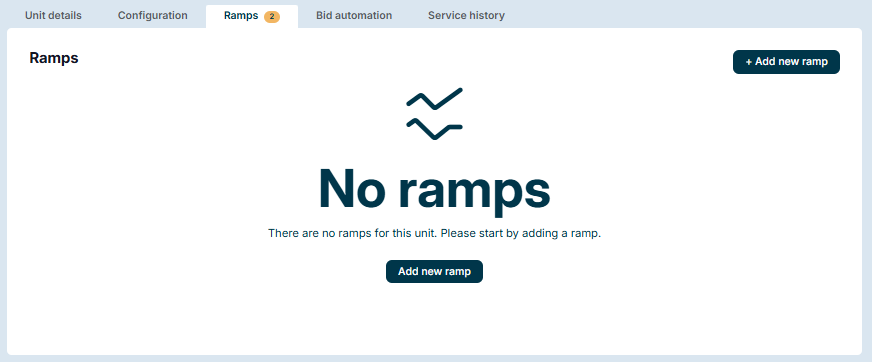
Create ramp
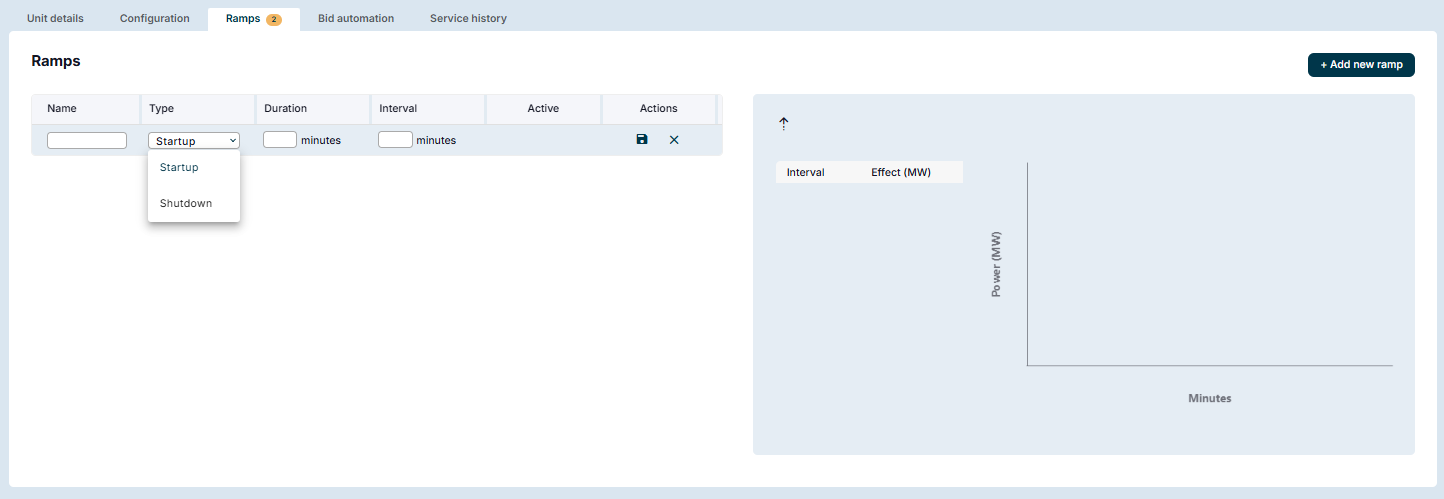
To create new ramp it is needed to press + Create ramp button and to pass the following steps:
-
Fill following fields:
- Name - ramp's name
- Type - Startup or Shutdown ramp type selected from the drill down list - see section Ramps
- Duration - how much time it is needed to start / stop the unit (in minutes)
- Interval - the amount of time between 2 given points in time (in minutes)
and press icon from Actions column to save and skip to the next step.
Example
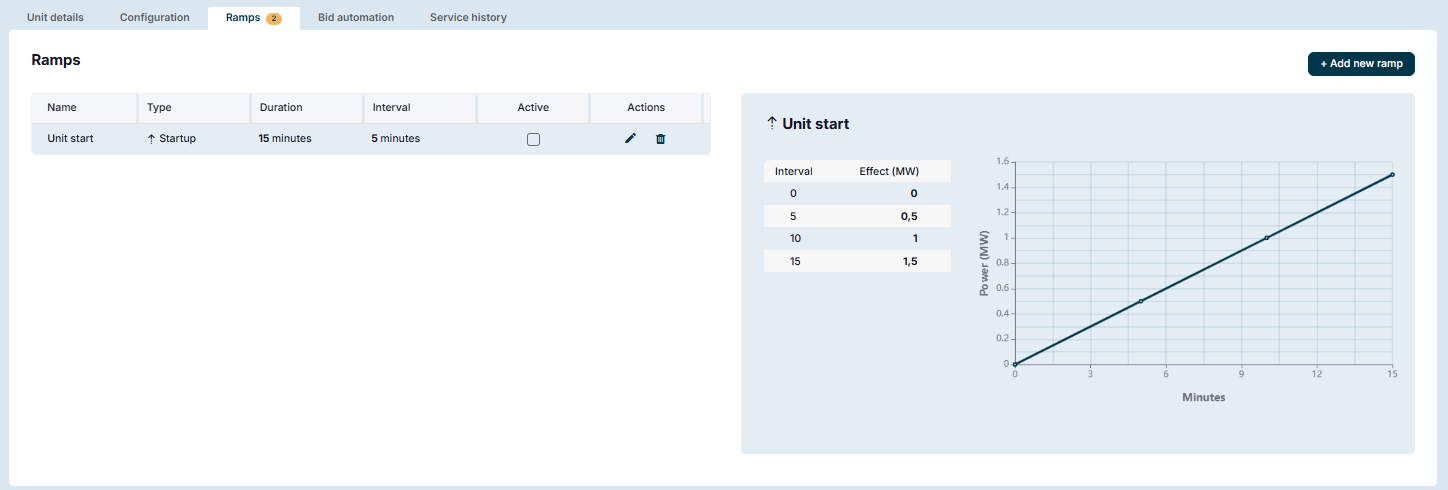
We create Startup ramp for a unit with nominal power 1,5 MW
- Duration is set to 15 minutes which means the unit needs 15 minutes to start operating from 0 MW to reach nominal power value 1,5 MW.
- Interval is set to 5 minutes which means duration (15 minutes) will be divided into 3 equal 5-minute time intervals (15min : 5min = 3) and nominal power will be divided into 3 equal 0,5 MW power interval (1,5 MW : 3 = 0,5 MW):
- from 0 to 5 minutes the unit will start operating from 0 MW to 0,5 MW
- from 5 to 10 minutes the unit's power will increase from 0,5 MW to 1,0 MW
- from 10 to 15 minutes the unit's power will increase from 1,0 MW to 1,5 MW to reach final nominal power value
Important Duration must be a multiple of interval.
-
The ramp has been created as a linear function (power as a function of time interval) - see Example from the previous step. Pressing edit icon from Actions column allows to edit as well Duration and Interval values from the previous step but also adjust Effect for each step of interval and adapt the curve in accordance to OEM's documentation. Remember to press icon from Actions column to save all changes or press to cancel.
Example
-
We change Interval from 5 to 3 minutes which means that now our previous line will be divided into 5 equal 3-minute time intervals (15min : 3min = 5).
-
In this case nominal power will be also divided into 5 equal 0,3 MW power interval (1,5 MW : 5 = 0,3 MW) but we change all Effect values for each time interval and we finally obtain the ramp curve.
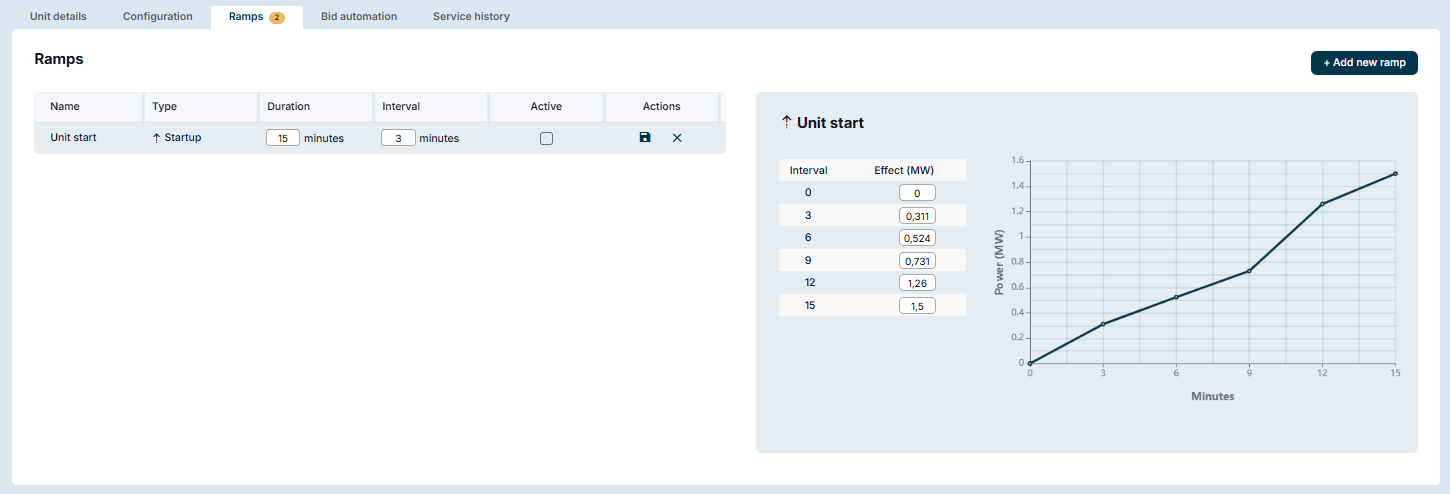
-
-
The last step is to activate the created ramp by marking Active checkbox for the given ramp.
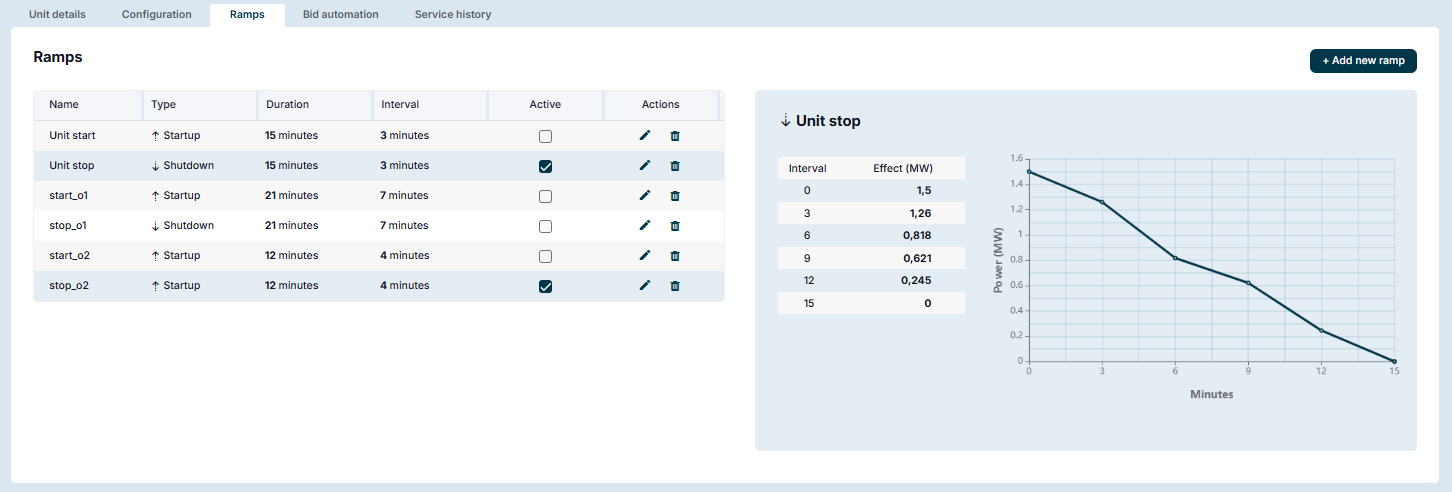
Important
- If user started with Startup ramp, then it is needed to create Shutdown ramp and vice versa.
- Each unit must have 2 ramps defined: Startup and Shutdown and both of them have to be in Active state. If not, user will be informed by yellow bubble on the Ramps tab - see section Ramps.
- It is possible to create more than 2 ramps but only one Startup ramp and one Shutdown ramp can be Active at the same time.
- Ramp editing is done by pressing icon and deleting by pressing icon.
Skip to the next Bid automation tab.
Back to the previous Configuration tab.
Bid automation
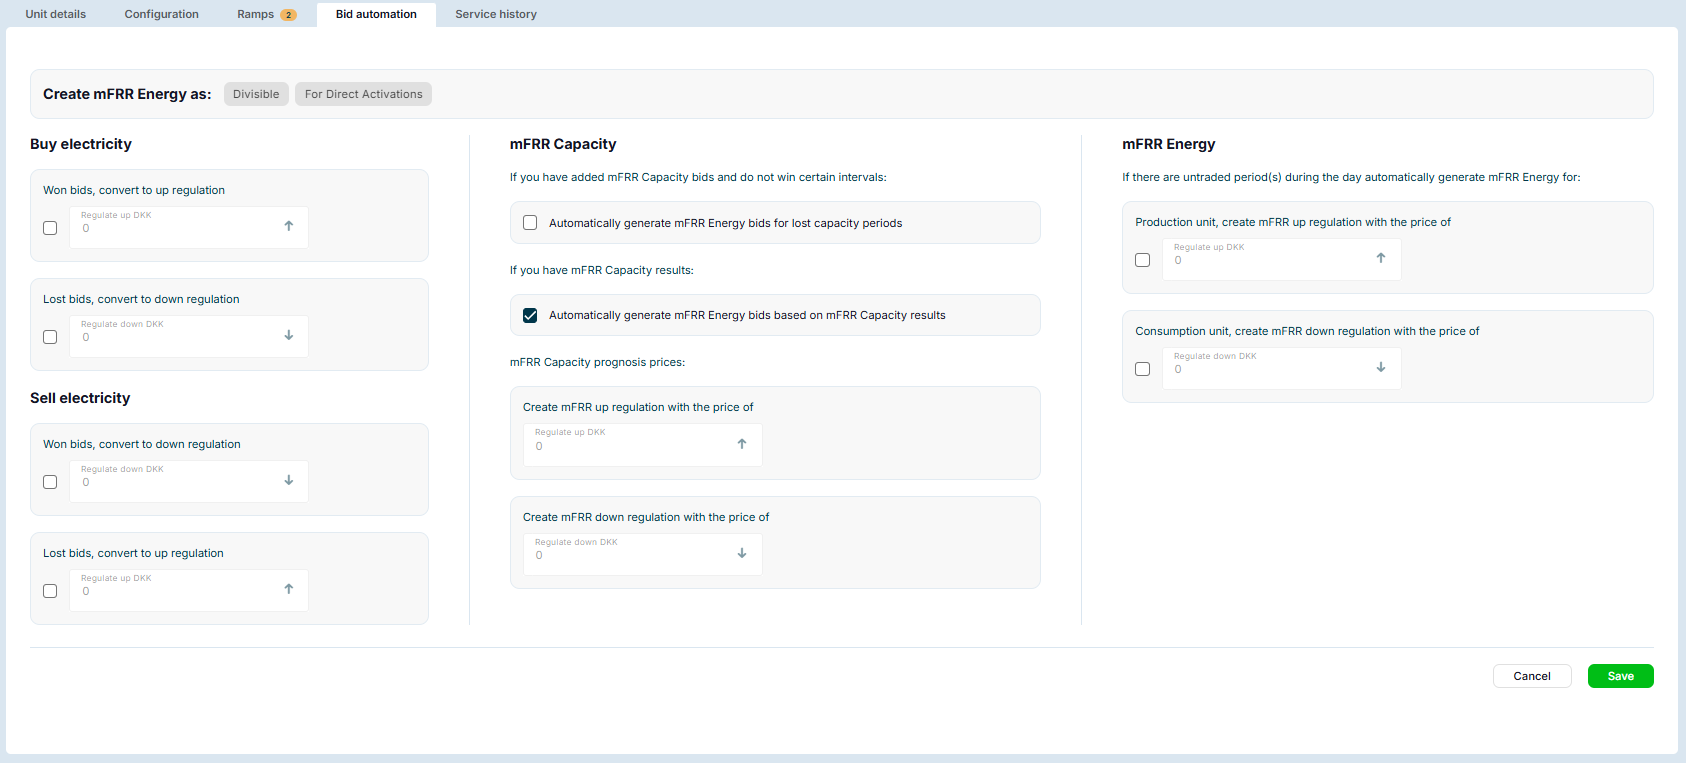
The ETMP application allows user to automate the actions of buying and selling electrical energy on the market. It is done in Bid automation tab on the unit level. This tab consists of 4 areas, where user needs to mark / unmark necessary checkbox and fill the proper fields:
- Create mFRR Energy as:
- Divisible - marked if partial activations are allowed for this unit,
- For Direct Activation - marked if unit can be activated anytime.
- Buy electricity - used to set the bids (in DKK) of buying energy for both won and lost ones.
- Sell electricity - used to set the bids (in DKK) of selling energy for both won and lost ones.
- mFRR Capacity - used for units that take part in the frequency regulation market to generate automatically mFRR Energy bids based on mFRR Capacity results or by set manually by user mFRR Capacity prognosis prices (in DKK). For more details see section mFRR Capacity bid(s) of Production registration chapter.
- mFRR Energy - used for units that take part in the frequency regulation market to generate automatically mFRR Energy bids for lost capacity periods or create mFRR up and/or down regulation doe production/consumption unit with price manually set by user if there are non-traded period(s) during day. Here user can also select if mFRR Energy should be Divisible or For Direct Activation. For more details see section mFRR Energy of Production registration chapter.
Skip to the next Service history tab.
Back to the previous Ramps tab.
Service history
Service history tab on unit level presents the list of history events when this unit was set in / out of service state:

For more details about setting a unit in / out of service state see section Set unit(s) in Service State.
Back to the previous Bid automation tab.